
Repeating yourself can be a hassle, but sometimes you’ve got to do it you’ve got to do it.
There’s nothing wrong with a bit of repetition. Many of the things we love are the byproduct of meticulously constructed repetition.
A recipe, for example, is a set of repeating steps. A song? The chorus is the best part! Sunrise and sunset? Both repeat! And who doesn’t love sunrises and sunsets!
Repeating statements in JavaScript are called loops, and loops are incredibly useful.
This guide will help you understand loops in the JavaScript language. Specifically, it will help you understand loop syntax and how to write and use the loops you create.
What is a JavaScript loop?
Imagine you wanted to purposefully repeat an action, for example, let’s say you wanted to count from 1 to 10.
There are a few ways you could do this in JavaScript.
Here’s the worst way to do it.
console.log(1);
console.log(2);
console.log(3);
console.log(4);
console.log(5);
console.log(6);
console.log(7);
console.log(8);
console.log(9);
console.log(10);
This is… not ideal at all.
Not only is typing out a statement ten times tedious, but it doesn’t count down in sequence.
Let’s look at a better way to repeat an action in JavaScript with loops!
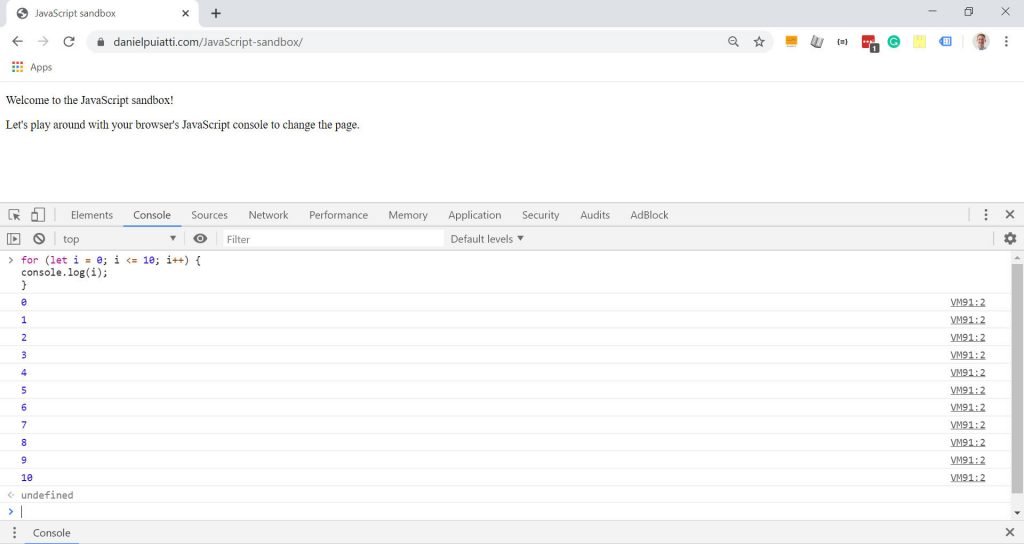
Using the original example above, let’s imagine we wanted to count from 1 to 10 in the JavaScript console.
Here’s what a JavaScript loop that does that would look like:
for (let i = 0; i <= 10; i++) {
console.log(i);
}
Try to run the loop above in your console. You should see something like this:
Pretty neat how JavaScript took care of all the repetition for you right?
You’ll be amazed at how many repetitive things you can automate with JavaScript.
Let’s start by taking a look at loop syntax.
JavaScript Loop syntax
Let’s disassemble the loop we used to count from 1 to 10 to better understand the loop syntax.
Here’s the loop:
for (let i = 0; i <= 10; i++) {
console.log(i);
}
There are a number of different types of loops, in this example, we’ll be using the for loop.
The for loop tells JavaScript to repeat an action according to the rules within the ().
Between the opening ( closing ) is where you write the rules which the for loop follows.
In the example above we’re telling JavaScript to repeat the loop 10 times. Let’s take a look at how the rules within the () tell the loop to do this.
There are three conditions within the () that provide instructions on how the loop should function.
The let i = 0; statement is the first condition called the initial expression. We use it to declare a starting point for the loop.
let i = 0 tells the loop where it should start. let i = 0 tells the loop to start at 0. You could start at any number below 10 for this example and the loop would count up from that number until it reaches 10.
i <= 10; statement is called a condition. The for loop refers to this condition every time it finishes running the statements withing the opening { and closing } (more on these below) to determine if it should continue to repeat the loop. In the for loop example above, the loop will repeat for as long as the i is less than or equal <= to 10.
i++; statement is called an increment expression. The for loop looks at the increment expression each time the loop runs. The increment expression tells JavaScript to increment the variable i by 1 each time the loop runs.
The statements within the { and closing } will be executed each time the loop runs.
console.log(i) will log the i value each time the loop runs and the i value will increment by one each time the loop runs.
Looping through items in an array
Let’s try using the loop with a more practical example. We’ll loop through a list of grocery items in our console.
Begin by opening up this page in a new browser window and placing it beside this window with the JavaScript console open.
We’ll start by creating an array of grocery items.
Type the following in your JavaScript console:
var groceryList = [
"bread",
"milk",
"cheese",
"eggs",
"salad",
"butter",
"chicken"
];
Now let’s use a loop to cycle through each item and display them in the console.
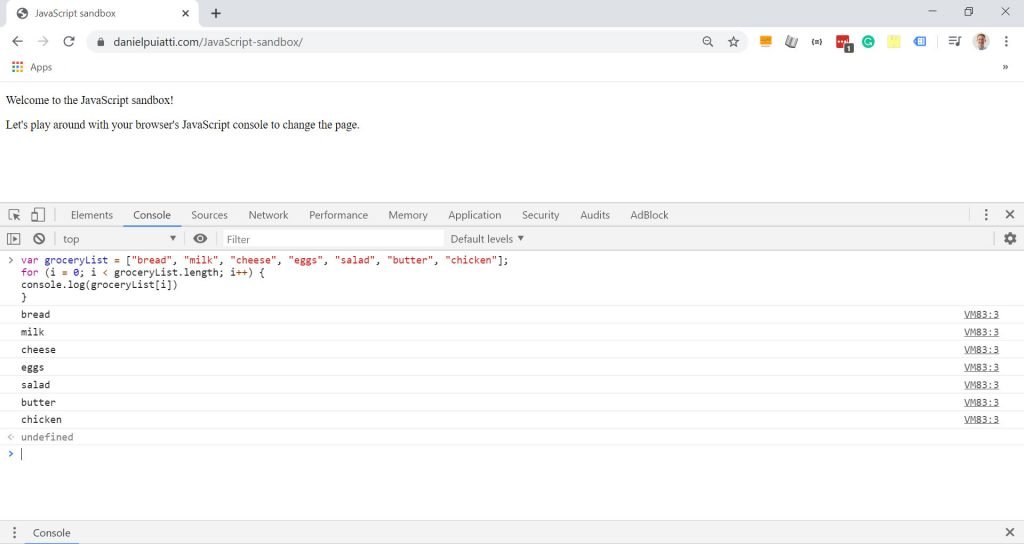
After declaring your groceryList array type the following:
for (i = 0; i < groceryList.length; i++) {
console.log(groceryList[i]);
}
You should see something like this:
You’ll notice that the loop condition was slightly different than the one we used to count from 10 to 1. Specifically, instead of i = <10 we used i < groceryList.length.
i < groceryList.length tells the loop to repeat for as long as i is less than the length of the groceryList array.
Using the .length property on an array returns the total number of items in the array.
So, the for loop condition i < groceryList.length will count the total number of items in the array and repeat the loop for each item in the array.
console.log(groceryList[i]) will display each item in the array in your console.
If you recall my guide on JavaScript arrays, you’ll remember that each item in an array has a numerical position.
For example, the groceryList array we created will have 6 numerical positions for each item in the array.
Position 0 is “bread”, position 1 is “milk”, position 2 is “cheese”, position 3 is “eggs”, positon 4 is “salad”, position 5 is “butter”, position 6 is “chicken”.
You’ll also recall that you can access each item in the array in the JavaScript console by typing the array name followed by the numerical position.
So, if I wanted to access eggs I’d type the following in my console:groceryList[3]
With console.log(groceryList[i]) we used [i] instead of a numerical position.
This allows the for loop to substitute the i with the numerical position of each item in the array, which it then logs to the console and then increments by one (remember this is what the i++ does).
Getting all the links on a page with JavaScript
Let’s try another practical example that you might find useful. We’re going to JavaScript to loop through all the links on a page.
Begin by opening up this page in a new browser window and placing it beside this window with the JavaScript console open.
Type the following in your console:
var getAllLinks = document.getElementsByTagName("a");
for (let i = 0; i < getAllLinks.length; i++) {
console.log(getAllLinks[i]);
}
You should see something like this:
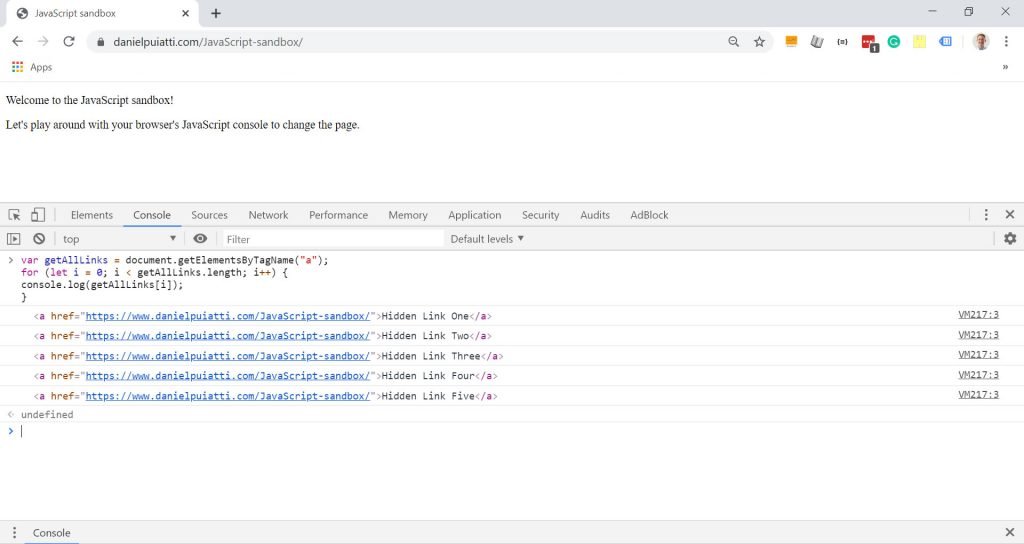
You’ll notice the console uncovered five hidden links on the page. Let’s examine the JavaScript code we ran to understand how a loop allowed us to uncover these links.
Here’s the code again:
var getAllLinks = document.getElementsByTagName("a");
for (let i = 0; i < getAllLinks.length; i++) {
console.log(getAllLinks[i]);
}
document.getElementsByTagName("a"); is a method which will find all HTML tags specified within the (). In this instance, we’ve asked JavaScript to find every a tag, otherwise known as a link. The method returns an array with every link it finds. We assigned this method to the variable getAllLinks.
Next, we set up a for loop that has:
An initial expression of let i = 0;.
A condition of i < getAllLinks.length;.
And an increment expression of i++.
Finally, we logged each item in the getAllLinks array to the console with console.log(getAllLinks[i]);.
Pretty handy right? I definitely think so.
Whether you need to collect a bunch of email addresses from a web page, cycle through a newsfeed or even count down from 10 to 1, loops are an essential tool for any JavaScript developer who needs to repeat something, who needs to repeat something.
Next up, let’s try some practical programming by collecting all the email addresses or links on a webpage with JavaScript.